Soft and Chewy Sugar Cookies

Soft and Chewy Sugar Cookies
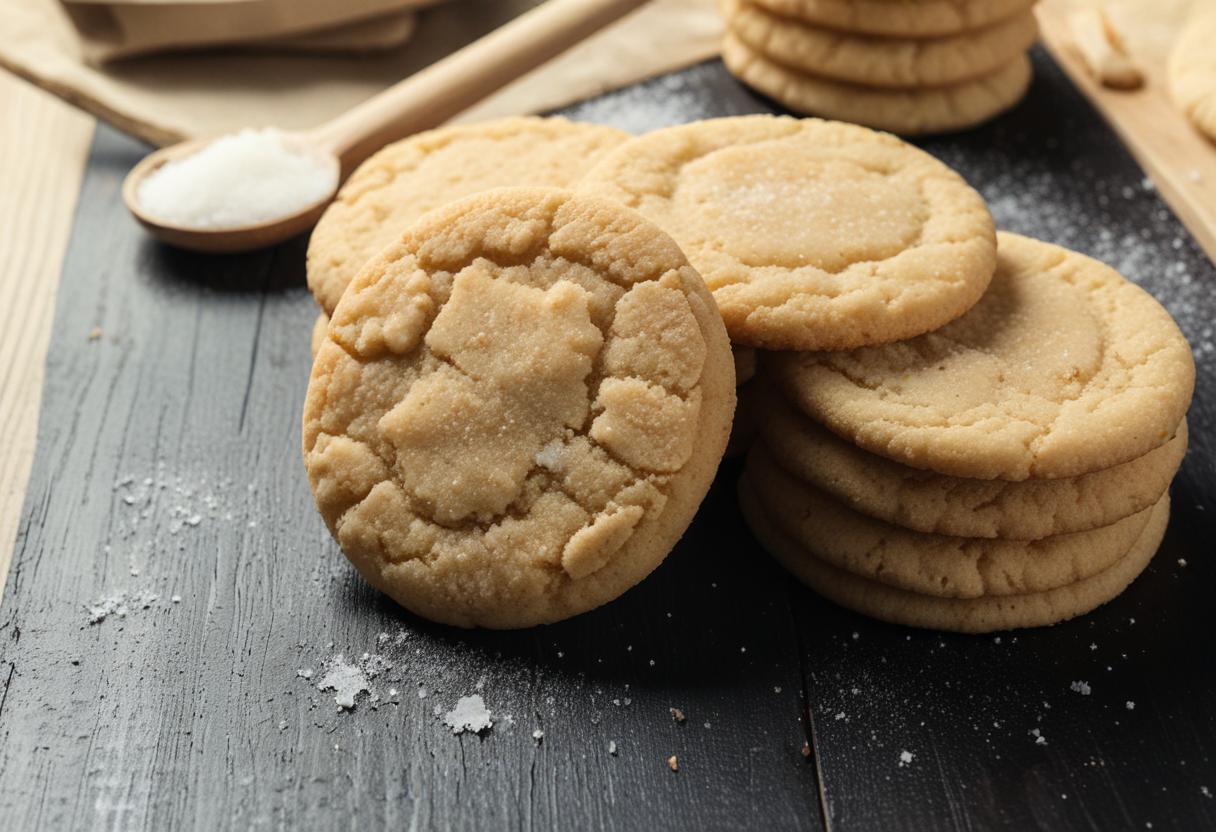
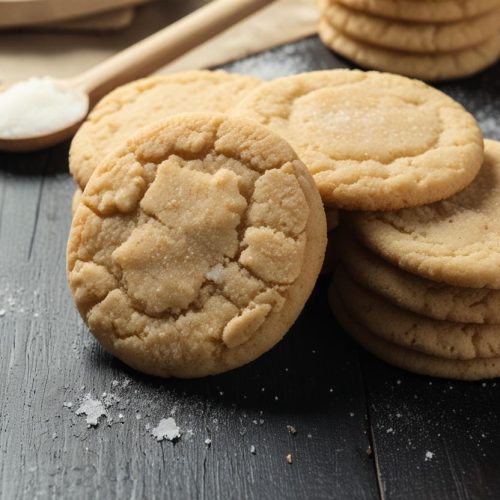
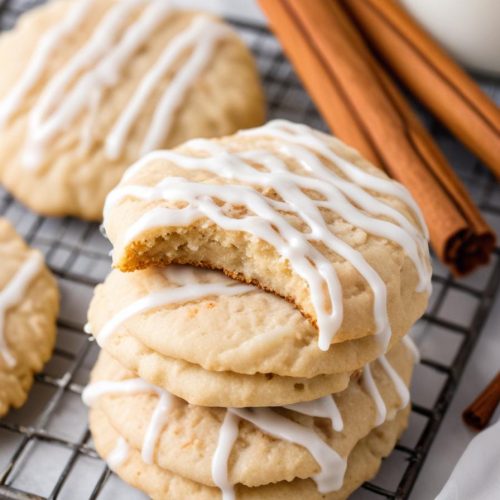
A Simple, Irresistible Treat When it comes to classic cookies, few can rival the timeless appeal of a Soft and Chewy Sugar Cookie. Perfectly golden on the outside, soft and tender on the inside, with just the right amount of sweetness—these cookies are simply irresistible! Made with minimal ingredients and no complicated steps, this is a recipe you’ll want to keep on hand for any occasion. Best of all, there's no dough chilling required, so you can have freshly baked cookies in under an hour!Why You’ll Love These Sugar CookiesChewy Texture: Thanks to a special ingredient (cornstarch), these cookies are extra soft and chewy—just how a sugar cookie should be.Simple Ingredients: You probably already have most of the ingredients on hand. No special trips to the store are needed!No Chilling: Unlike many sugar cookie recipes that require chilling the dough, these cookies are quick and easy. Just mix, roll, and bake!Great for Any Occasion: Whether it’s a holiday, a family gathering, or just a treat to enjoy with a cup of tea, these cookies are perfect for every occasion. Soft and Chewy Sugar CookiesThese Soft and Chewy Sugar Cookies are the perfect combination of buttery goodness, softness, and a slightly crisped edge. This drop-style cookie is simple to make, with no need for rolling out dough or chilling. The dough is shaped into balls, rolled in sugar, and baked until golden. You’ll love how these cookies are tender and sweet with just the right amount of chew.
Ingredients
- 2 3/4 cups all-purpose flour
- 2 teaspoons cornstarch
- 1/2 teaspoon baking soda
- 1/4 teaspoon salt
- 1 cup unsalted butter softened
- 1 1/3 cups granulated sugar divided
- 1 large egg
- 1 large egg yolk discard the egg white
- 2 teaspoons vanilla extract
- 1/4 teaspoon almond extract optional
- 1/3 cup granulated sugar for rolling the cookies
Instructions
- Preheat the Oven
- Preheat your oven to 350°F (175°C). Line two baking sheets with parchment paper for easy cleanup.
- Mix Dry Ingredients
- In a medium bowl, whisk together the flour, cornstarch, baking soda, and salt. Set aside.
- Cream the Butter and Sugar
- In a large mixing bowl, beat the softened butter and 1 1/4 cups of sugar together until light and fluffy. This should take about 2-3 minutes.
- Add Wet Ingredients
- Add the egg, egg yolk, vanilla extract, and almond extract (if using) to the butter mixture. Beat until the mixture is smooth and fully combined.
- Combine Wet and Dry Ingredients
- Gradually add the dry flour mixture to the wet ingredients in two parts. Mix on low speed until just combined.
- Prepare for Rolling
- Pour the remaining 1/3 cup of sugar onto a plate or shallow dish.
- Shape the Cookies
- Scoop about 1 tablespoon of dough and roll it into a ball. Roll each dough ball in the sugar and place them about 2 inches apart on the prepared baking sheets.
- Bake the Cookies
- Bake one tray at a time on the middle rack of the oven for 8-10 minutes, or until the tops of the cookies are just set and slightly cracked.
- Cool the Cookies
- Let the cookies cool on the baking sheet for at least 10 minutes before transferring them to a wire rack to cool completely.
Notes
Tips for the Best Sugar Cookies
A: Yes! You can prepare the dough and refrigerate it for up to 2 days before rolling and baking the cookies. Alternatively, you can freeze the cookie dough balls and bake them fresh when you need them. Q: Can I use a different sugar for rolling the cookies?
A: While granulated sugar is the traditional choice, you can use colored sugar for a fun twist, especially for holidays or parties. Q: Why are my cookies flat?
A: If your cookies turn out flat, it might be due to warm dough or melted butter. Be sure to use softened (not melted) butter, and try to bake the cookies as soon as you roll them into balls. Related Recipes You Might Love
- Use Room Temperature Butter: Room temperature butter is key for achieving that light, airy texture. Cold butter won’t blend as smoothly, and melted butter can result in flat cookies.
- Don’t Overmix the Dough: Once the flour mixture is added, mix just until combined. Overmixing can result in tough cookies, and we want these to be as soft as possible!
- Adjust Baking Time for Chewiness: For ultra-chewy cookies, err on the side of slightly underbaking. The cookies will continue to cook on the sheet once you remove them from the oven.
- Even Dough Balls: To ensure uniform cookies, use a cookie scoop or tablespoon to measure out the dough. This will make sure they all bake evenly.
- Flavor Variations: If you love citrus, a tablespoon of lemon zest can be added to the dough for a refreshing twist.
A: Yes! You can prepare the dough and refrigerate it for up to 2 days before rolling and baking the cookies. Alternatively, you can freeze the cookie dough balls and bake them fresh when you need them. Q: Can I use a different sugar for rolling the cookies?
A: While granulated sugar is the traditional choice, you can use colored sugar for a fun twist, especially for holidays or parties. Q: Why are my cookies flat?
A: If your cookies turn out flat, it might be due to warm dough or melted butter. Be sure to use softened (not melted) butter, and try to bake the cookies as soon as you roll them into balls. Related Recipes You Might Love
- Snickerdoodles: If you like sugar cookies but want something a little more spiced, try these classic snickerdoodles, rolled in cinnamon sugar.
- Butter Cookies: These simple, buttery treats melt in your mouth and are perfect for those who appreciate a rich, indulgent flavor.
- Chocolate Chip Cookies: A timeless favorite, these thick and chewy chocolate chip cookies will never go out of style.
Nutrition
Calories: 135kcalCarbohydrates: 19gProtein: 1gFat: 6gSaturated Fat: 4gPolyunsaturated Fat: 0.3gMonounsaturated Fat: 2gTrans Fat: 0.2gCholesterol: 26mgSodium: 39mgPotassium: 16mgFiber: 0.3gSugar: 10gVitamin A: 193IUCalcium: 5mgIron: 1mg
Tried this recipe?Let us know how it was!


Soft and Chewy Snickerdoodles
Soft and Chewy Snickerdoodles
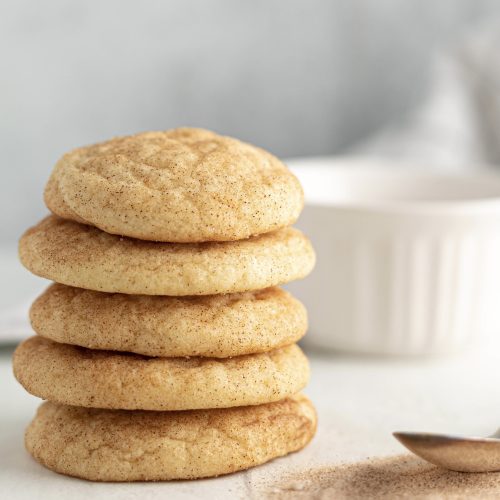
Soft and Chewy Snickerdoodle Cookies: A Classic Recipe with a Cinnamon Twist If you're a fan of cinnamon and sugar, these Soft and Chewy Snickerdoodle Cookies are going to be your new favourite treat. Their crispy, cinnamon-sugar-coated exterior and soft, melt-in-your-mouth interior are the perfect combination of sweet and spice. Whether you're baking for a holiday, a special event, or just because, these cookies will never disappoint.Snickerdoodles are a classic cookie that never goes out of style. They're incredibly easy to make, and the dough comes together quickly. Plus, they bake in under 10 minutes, which means you'll have fresh cookies in no time! With their perfect balance of sweet cinnamon flavour and soft texture, these cookies are sure to please everyone.Why You’ll Love These Snickerdoodle CookiesQuick and Easy: This recipe comes together in under 30 minutes, so you can satisfy your cookie cravings without spending hours in the kitchen.Soft and Chewy: The combination of butter, cream of tartar, and brown sugar creates a soft, chewy cookie with just the right amount of cinnamon-sugar crunch.Classic Flavour: Cinnamon and sugar are a match made in heaven, and snickerdoodles are the perfect way to enjoy them.Perfect for Any Occasion: Whether you're baking for a holiday, a special event, or just because, these cookies are a guaranteed hit. These Snickerdoodles are soft, buttery, and perfectly spiced with cinnamon. Their signature crackly tops and warm, sweet flavor make them a favorite treat for any occasion. Simple to make and even easier to enjoy, these cookies are sure to be a hit with everyone!
Ingredients
Cookies
- 1 cup unsalted butter softened to room temperature
- 1 1/3 cups granulated sugar
- 1/3 cup brown sugar packed
- 2 large eggs at room temperature
- 1 1/2 teaspoons vanilla extract
- 3 1/4 cups all-purpose flour spooned and leveled
- 1 1/2 teaspoons cream of tartar
- 1 teaspoon baking soda
- 1/2 teaspoon salt
Cinnamon-Sugar Coating
- 1/3 cup granulated sugar
- 1 1/2 tablespoons ground cinnamon
Instructions
Preheat the Oven
- Preheat your oven to 400°F (200°C). Line two baking sheets with parchment paper or lightly coat them with nonstick spray.
Mix Dry Ingredients
- In a medium-sized bowl, whisk together 3 1/4 cups flour, 1 1/2 teaspoons cream of tartar, 1 teaspoon baking soda, and 1/2 teaspoon salt. Set this mixture aside.
Cream the Butter and Sugars
- In a separate large bowl, beat 1 cup softened butter with 1 1/3 cups granulated sugar and 1/3 cup brown sugarusing an electric mixer. Beat for about 2 minutes, until the mixture is light and creamy. Scrape down the sides of the bowl as needed.
Add the Wet Ingredients
- Add 2 large eggs and 1 1/2 teaspoons vanilla extract to the creamed butter and sugar. Mix until smooth and fully incorporated.
Combine Wet and Dry Ingredients
- Gradually add half of the dry flour mixture to the wet ingredients and beat until just combined. Add the remaining dry ingredients and mix until the dough is formed. You may need to finish mixing by hand to ensure all the flour is incorporated. Be careful not to overmix the dough.
Prepare the Cinnamon-Sugar Coating
- In a shallow dish or plate, combine 1/3 cup granulated sugar with 1 1/2 tablespoons cinnamon. Stir to mix.
Form and Coat the Dough
- Scoop about 1 tablespoon of dough and roll it into a ball with your hands. Roll each ball in the cinnamon-sugar mixture, making sure it is evenly coated.
Arrange on Baking Sheets
- Place the cinnamon-sugar-coated dough balls about 2 inches apart on the prepared baking sheets.
Bake the Cookies
- Bake for 6-8 minutes or until the cookies are set and slightly golden around the edges. Remove them from the oven and let them sit on the baking sheets for about 2 minutes before transferring them to a wire rack to cool completely.
Notes
Pro Tips for Perfect Snickerdoodles
- Room Temperature Ingredients: For the best texture, make sure your butter and eggs are at room temperature. This helps them blend together smoothly, resulting in a softer cookie.
- Don’t Overmix the Dough: Once the dry ingredients are added, mix until just combined. Overmixing can lead to dense cookies, and we want these to be light and chewy!
- Use a Cookie Scoop: A cookie scoop or tablespoon helps ensure that your cookies are evenly sized, so they bake evenly and have the same soft, chewy texture.
- Bake at the Right Temperature: Snickerdoodles are best when they’re slightly underbaked, so keep an eye on them! You want them to be just set but not overly browned.
- Chill the Dough (Optional): If you want a thicker, chewier cookie, you can chill the dough for about 30 minutesbefore baking. This will help the cookies hold their shape better as they bake.
Why These Snickerdoodle Cookies Are a Favorite
Snickerdoodles are a nostalgic cookie that has been around for generations, and it’s easy to see why. They have a soft, chewy texture that melts in your mouth, complemented by the warm flavor of cinnamon and sugar. These cookies are the perfect balance of sweetness and spice, and they have a slight crispiness on the outside that makes each bite satisfying.
Whether you’re sharing them with family, serving them at a holiday party, or simply enjoying them with a cup of coffee or milk, these Soft and Chewy Snickerdoodles are sure to be a crowd-pleaser!
Storage Tips
To keep your snickerdoodles fresh, store them in an airtight container at room temperature for up to 1 week. If you want to save them for later, they also freeze wonderfully! Just place the cooled cookies in a freezer-safe bag or container, and they’ll stay fresh for up to 2 months. Be sure to layer them with parchment paper to prevent sticking.
Frequently Asked Questions
Q: Can I make the dough ahead of time?
A: Yes! You can prepare the dough and refrigerate it for up to 2 days before rolling into balls and baking. This can actually help develop the flavor even more. Q: What’s the purpose of the cream of tartar in snickerdoodles?
A: Cream of tartar gives snickerdoodles their signature chewy texture. It also reacts with the baking soda to help the cookies rise and gives them that classic tangy flavor. Q: How can I make my cookies extra thick?
A: To achieve a thicker cookie, you can chill the dough for 30 minutes to an hour before rolling and baking. Final Thoughts If you’re looking for a quick and easy cookie that’s guaranteed to please, Snickerdoodles are the way to go. With their soft texture, cinnamon-sugar coating, and irresistible flavor, they’re perfect for any occasion. Whether it’s a holiday or just a Tuesday afternoon, baking a batch of these Soft and Chewy Snickerdoodles will bring a little sweetness into your day. Happy baking!
Nutrition
Calories: 121kcalCarbohydrates: 18gProtein: 1gFat: 5gSaturated Fat: 3gPolyunsaturated Fat: 0.3gMonounsaturated Fat: 1gTrans Fat: 0.2gCholesterol: 20mgSodium: 61mgPotassium: 38mgFiber: 0.4gSugar: 10gVitamin A: 155IUVitamin C: 0.01mgCalcium: 9mgIron: 1mg
Tried this recipe?Let us know how it was!
Spiced Eggnog Thumbprint Cookies with Rum Ganache

Spiced Eggnog Thumbprint Cookies with Rum Ganache
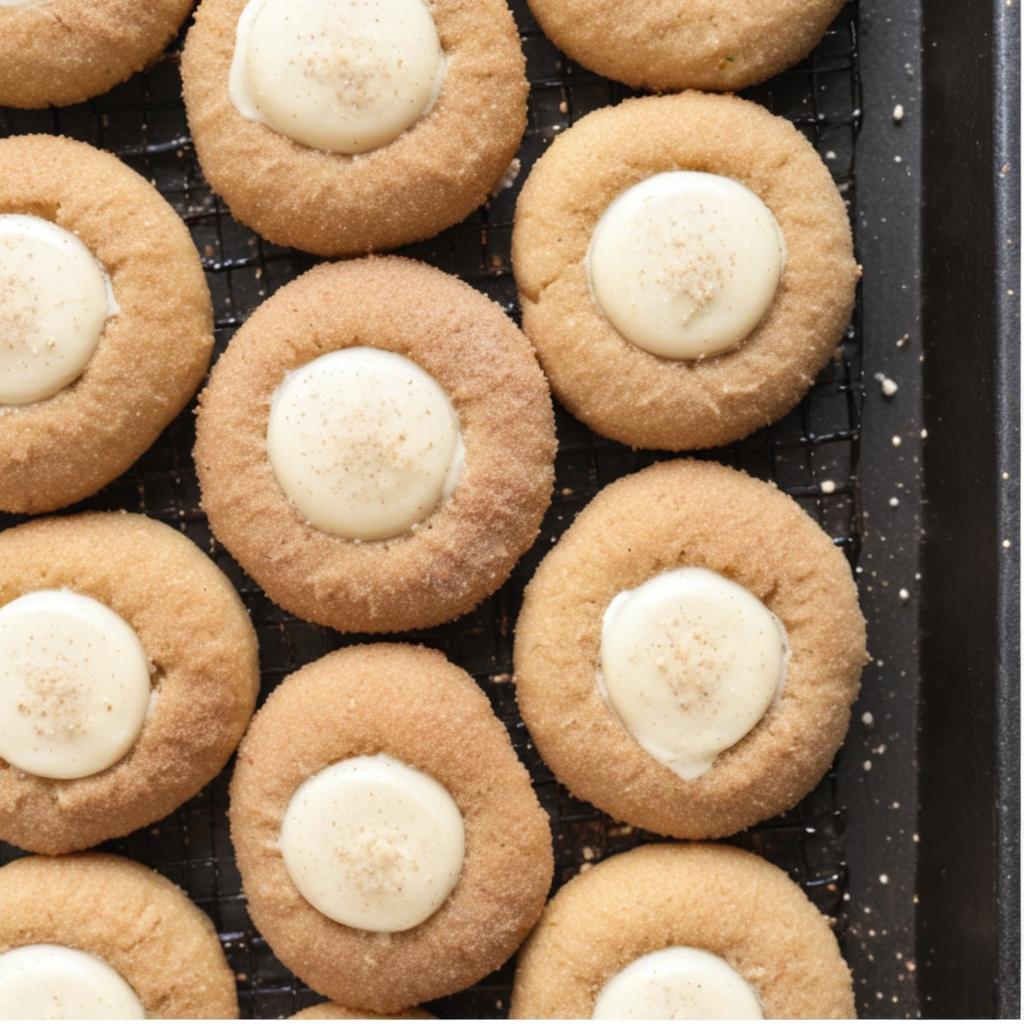
Spiced Eggnog Thumbprint Cookies with Rum Ganache: A Festive Holiday Treat The holidays are all about cozy flavors, family traditions, and sharing sweet moments with loved ones. If you're looking to bake something extra special this season, Spiced Eggnog Thumbprint Cookies with Rum Ganache are a must-try. These cookies are soft, spiced, and full of festive flavors, with a buttery snickerdoodle base, a smooth eggnog ganache filling, and a dusting of freshly grated nutmeg to finish. In this blog post, I'll walk you through how to make these Spiced Eggnog Thumbprint Cookies, with plenty of tips, tricks, and recommendations for ensuring they turn out perfectly every time. Whether you're a seasoned baker or a holiday baking newbie, this recipe is sure to become a new favourite in your holiday cookie repertoire.Why These Cookies Are Perfect for the HolidaysFirst things first, let’s talk about why these cookies are the perfect holiday treat:Classic Holiday Flavors: Cinnamon, nutmeg, and eggnog are all quintessential holiday flavors that remind us of cozy nights by the fire, Christmas parties, and family get-togethers.Soft and Chewy Texture: These cookies have the ideal snickerdoodle base—soft, chewy, and perfectly spiced. The eggnog ganache adds a creamy, indulgent twist.Visually Stunning: The thumbprint shape makes these cookies look polished and festive. The little indentation is filled with the rich, creamy eggnog ganache, and a pinch of freshly grated nutmeg gives them a finishing touch that’s both elegant and delicious.Great for Gifting: These cookies make a beautiful addition to any holiday cookie box or gift platter. Their unique flavor profile makes them stand out among traditional holiday cookies.Now, let's dive into how to make these festive cookies, step-by-step!Ingredients You’ll NeedBefore you start baking, make sure you have all the ingredients ready:For the Cookies:Unsalted Butter: The base of the cookie dough, giving it richness and a soft texture.Light Brown Sugar and Granulated Sugar: For sweetness and a hint of caramel flavor from the brown sugar.Egg: Adds structure and helps bind the dough together.Vanilla Extract: For added depth of flavor.All-Purpose Flour: The main dry ingredient that makes up the bulk of the dough. Weighing the flour is crucial for the right texture.Kosher Salt, Baking Soda, and Cream of Tartar: These ingredients balance the sweetness, help with the rise, and ensure a soft, chewy cookie.For Rolling the Dough:Cinnamon and Sugar: A classic snickerdoodle touch that adds warmth and sweetness.For the Eggnog Ganache:White Chocolate: This creates a creamy and smooth filling. Use high-quality white chocolate for the best results.Eggnog: The star of the ganache! It gives the filling its signature flavor. Use either traditional or dairy-free eggnog, depending on your preference.Dark Rum or Rum Extract: This gives the ganache its warm, slightly boozy flavor. If you prefer a non-alcoholic version, rum extract is a great substitute.Freshly Grated Nutmeg: This adds a final holiday touch to the filling and serves as a garnish for the cookies.Step-by-Step InstructionsStep 1: Preheat Your OvenStart by preheating your oven to 350°F (175°C). This is the perfect temperature for baking snickerdoodle-style cookies. Line two baking sheets with parchment paper or silicone baking mats to ensure the cookies bake evenly and don’t stick.Step 2: Cream the Butter and SugarsIn the bowl of your stand mixer (or using a hand mixer), cream together the butter, light brown sugar, and granulated sugar on medium speed until the mixture is light and fluffy. This should take about 2-3 minutes. Scrape down the sides of the bowl to ensure all the ingredients are evenly mixed.This step is crucial because creaming the butter and sugar properly will help create a smooth, airy dough and a light texture for the cookies. If you don’t have a stand mixer, a hand mixer or even a wooden spoon will work fine—just make sure to cream the butter and sugar thoroughly.Step 3: Add the Wet IngredientsOnce the butter and sugar mixture is fluffy, add the egg and vanilla extract. Mix until everything is combined. The egg will help bind the dough and provide moisture, while the vanilla adds a warm, sweet aroma. Be sure to scrape down the sides of the bowl after adding the egg and vanilla to ensure even mixing.Step 4: Combine the Dry IngredientsIn a separate bowl, whisk together the flour, baking soda, salt, and cream of tartar. The cream of tartar is essential in snickerdoodle recipes, as it gives the cookies their signature chewy texture and prevents them from spreading too much.Once the dry ingredients are combined, gradually add them to the wet ingredients in your mixer. Mix on low speed until a thick dough forms. Be careful not to overmix at this stage—just mix until the dry ingredients are incorporated.Pro Tip: If you have a scale, weigh the flour to ensure you’re using the correct amount. Too much flour can lead to a dry dough, while too little can make the cookies spread too much.Step 5: Roll the Dough into BallsScoop out about 1 tablespoon of dough (about 15 grams) and roll it into a ball using your hands or a cookie scoop. Then, roll the dough balls in a cinnamon-sugar mixture (1/3 cup sugar mixed with 2 tablespoons cinnamon). This gives the cookies their characteristic sweet, spiced coating.Place the dough balls on the prepared baking sheets, spacing them about 2 inches apart. Then, press your thumb or the back of a spoon into the center of each ball to create an indentation. If the dough cracks around the edges, simply press it back together with your fingers. This step is essential because it creates the space for the eggnog ganache filling.Step 6: Bake the CookiesBake the cookies in the preheated oven for 7-8 minutes. They should be slightly puffed with cracks forming on top. If you notice that the indentation has filled in during baking, simply press it down gently again while the cookies are still warm.Once they are done, remove them from the oven and allow them to cool on the baking sheets for 5 minutes. This is the best time to fix any imperfections in the indentation before they fully set.Step 7: Make the Eggnog Ganache FillingWhile the cookies cool, it’s time to make the eggnog ganache. In a microwave-safe bowl, combine the white chocolate, eggnog, and dark rum. Microwave the mixture in 15-second intervals, stirring between each interval until the chocolate is fully melted and the ganache is smooth.If you prefer a slightly stronger rum flavor, feel free to add more rum extract or dark rum. Once the ganache is smooth, stir in the freshly grated nutmeg for a holiday punch. Let the ganache cool for a few minutes to thicken slightly.Step 8: Fill the ThumbprintsOnce the cookies have cooled completely, fill each thumbprint with about ½ teaspoon of the eggnog ganache. Use a small spoon or a piping bag to fill the centers evenly. The ganache will firm up as it cools, giving each cookie a rich and creamy filling.Pro Tip: If you like your filling to set more quickly, pop the cookies in the fridge for about 15-20 minutes.Step 9: Garnish and ServeTo finish, top each cookie with a pinch of freshly grated nutmeg. This adds a final burst of flavor and makes the cookies look extra festive.Allow the cookies to sit at room temperature for a few hours to allow the ganache to set completely. If you’re in a hurry, you can refrigerate them to speed up the process.Baking Tips and TricksMeasuring Flour: Properly measure your flour to avoid a dense or spread-out cookie. Weighing your flour is the best method, but if you don’t have a scale, make sure to spoon the flour into your measuring cup and level it off.Don’t Over bake: For soft, chewy cookies, keep an eye on the baking time. These cookies will firm up as they cool, so they’re best when slightly underbaked in the center.Customise Your Filling: If you’re not a fan of rum, try rum extract for a more subtle flavor or substitute vanilla extract for a non-alcoholic version.Make-Ahead Option: These cookies can be baked ahead of time and stored in an airtight container for up to a week. Just fill them with ganache when you're ready to serve.Why You'll Love These CookiesThese Spiced Eggnog Thumbprint Cookies with Rum Ganache are a perfect way to bring festive flavours into your kitchen. With their soft, chewy snickerdoodle base and the rich, spiced eggnog ganache filling, they’ll quickly become a holiday favorite. Whether you’re making them for a cookie exchange, a family gathering, or just for yourself, these cookies will bring joy to your holiday season.Spiced Eggnog Thumbprint Cookies with Rum GanacheThese Spiced Eggnog Thumbprint Cookies with Rum Ganache are the ultimate holiday treat! A soft, cinnamon-sugar cookie base is filled with a rich, creamy eggnog ganache that's spiked with rum, creating the perfect combination of sweet, spiced, and boozy flavors. Topped with freshly grated nutmeg, these cookies are a festive must for your cookie boxes, holiday parties, or cookie exchanges.
Ingredients
Cookies
- 4 oz 1 stick unsalted butter, softened
- ½ cup light brown sugar packed
- ¼ cup granulated sugar
- 1 large egg room temperature
- 1 tsp vanilla extract
- 245 g all-purpose flour about 1 ¾ cups – see notes
- ¼ tsp kosher salt
- ¼ tsp baking soda
- ½ tsp cream of tartar
Rolling the Dough
- 1/3 cup granulated sugar mixed with 2 tbsp cinnamon
Eggnog Ganache Filling
- 4 oz white chocolate chopped or broken into small pieces
- 2 tbsp eggnog use regular or dairy-free for a twist
- 1 tbsp dark rum or 1 tsp rum extract
- ¼ tsp freshly grated nutmeg for extra flavor
Instructions
- Preheat the oven to 350°F (175°C). Line two baking sheets with parchment paper or silicone mats for easy cleanup.
- In the bowl of a stand mixer fitted with the paddle attachment, cream together the butter, brown sugar, and granulated sugar on medium speed until light and fluffy. Scrape down the sides of the bowl as needed.
- Add the egg and vanilla extract, and continue mixing until the dough is smooth and well combined, about 1-2 minutes.
- In a separate bowl, whisk together the flour, salt, baking soda, and cream of tartar until evenly combined. Gradually add the dry ingredients to the wet mixture, mixing on low speed until a thick dough forms.
- Roll the dough into 1-inch balls (about 15 grams each) using your hands or a cookie scoop. Roll each ball in the cinnamon-sugar mixture until evenly coated, then place them on the prepared baking sheets. Use your thumb or the back of a small spoon to press a well into the center of each dough ball. If the dough cracks, gently press it back together.
- Bake in the preheated oven for 7-8 minutes. The cookies should be slightly puffed with cracks forming on top. If the indentation has filled in during baking, simply press down gently again while the cookies are still warm.
- While the cookies are cooling, prepare the eggnog ganache filling: In a microwave-safe bowl, combine the white chocolate, eggnog, and rum. Microwave in 15-second intervals, stirring between each, until the chocolate is fully melted and the mixture is smooth. Stir in the freshly grated nutmeg if you like. The ganache will be loose initially but will firm up as it cools.
- Once the cookies are cooled, fill each thumbprint with about ½ teaspoon of the eggnog ganache. Top each cookie with a pinch of freshly grated nutmeg for an extra touch of holiday flavor.
- Allow the cookies to sit at room temperature for a few hours to allow the ganache to set. For quicker results, you can refrigerate them for 15-20 minutes to firm up the filling.
Notes
Notes
- Flour Measurement: To get the most accurate flour measurement, weigh it at 245 grams. If you don’t have a scale, spoon and level the flour for best results. Using too much flour can make the cookies too dry, while too little can cause them to spread too much during baking.
- Eggnog: You can use traditional dairy-based eggnog or a dairy-free variety, like coconut milk-based eggnog, for a unique flavor profile.
- Rum Flavor: If you prefer not to use alcohol, substitute rum extract for the dark rum. Start with 1 teaspoon and adjust to taste.
- Cookie Texture: For soft, chewy cookies, be careful not to overbake them. If they become a bit too firm while cooling, they’ll still taste great, but they might lose some of that melt-in-your-mouth texture. Why These Spiced Eggnog Thumbprint Cookies Are Perfect for the Holidays: These cookies are a true holiday indulgence, with their blend of spiced cinnamon, creamy eggnog, and a hint of rum. The soft and chewy snickerdoodle base provides the perfect backdrop for the rich, boozy eggnog ganache filling. Topped with freshly grated nutmeg, these cookies have all the cozy flavors of the season. Whether you’re baking for a family gathering, a cookie swap, or just because it’s the holidays, these Spiced Eggnog Thumbprint Cookies with Rum Ganache will be a hit at any celebration!
Nutrition
Calories: 92kcalCarbohydrates: 13gProtein: 1gFat: 4gSaturated Fat: 2gPolyunsaturated Fat: 0.2gMonounsaturated Fat: 1gTrans Fat: 0.1gCholesterol: 12mgSodium: 30mgPotassium: 31mgFiber: 0.2gSugar: 8gVitamin A: 88IUVitamin C: 0.03mgCalcium: 12mgIron: 0.4mg
Tried this recipe?Let us know how it was!

Eggnog Coconut Crumble Cookies with Cinnamon Glaze
Eggnog Coconut Crumble Cookies with Cinnamon Glaze
A Cozy Twist on a Holiday ClassicThe holidays are a time for traditions: cozy evenings, twinkling lights, and, of course, baking. One of my favorite parts of the season is the opportunity to bake and share sweet treats with loved ones. While classic eggnog cookies are a beloved favorite, I wanted to create something a little different this year—something that would bring a fresh twist to the table without losing the comforting flavours we all adore.Enter the Eggnog Coconut Crumble Cookies with Cinnamon Glaze. These soft, chewy cookies bring together the rich, spiced flavor of eggnog with a touch of toasted coconut for a unique flavor profile. The cinnamon glaze drizzled over the top is the perfect finishing touch—adding a hint of sweetness and a warm, cozy spice. They’re perfect for cookie swaps, holiday gatherings, or simply enjoying with a cup of your favorite warm beverage. In this post, I’ll walk you through how to make these delicious cookies, share some helpful tips for success, and explain why this recipe is sure to become a holiday favorite in your house.Why These Eggnog Coconut Crumble Cookies are the Perfect Holiday Treat 1. Comforting Holiday Flavours: Eggnog is one of those holiday flavors that instantly evokes warmth and nostalgia. This recipe gives you all the comforting essence of eggnog with the added depth of cinnamon, nutmeg, and a little ginger (optional), which creates a rich, cozy flavor in every bite. But what sets these cookies apart is the addition of toasted coconut. It brings an unexpected crunch and a delightful tropical twist to the classic eggnog flavor.2. Soft and Chewy Texture: One of the hallmarks of a great holiday cookie is the texture. These Eggnog Coconut Crumble Cookies are the perfect balance of soft and chewy with just a touch of crispness on the outside. The toasted coconut gives each bite a little bit of crunch, adding texture without overpowering the soft, chewy base.3. Cinnamon Glaze for the Win: The cinnamon glaze on top of these cookies takes them from delicious to divine. The glaze is light but sweet and adds a little extra flavor to every bite. It's not too heavy or sticky, so it doesn’t overwhelm the cookies—it just adds the perfect amount of sweetness and spice.4. Perfect for Gifting and Sharing: Whether you’re baking for a cookie swap or packing up a tin of homemade treats for a friend, these cookies make the perfect gift. Their unique flavor combination, the glossy drizzle of glaze, and the soft crumb texture make them stand out from the typical holiday cookie.How to Make Eggnog Coconut Crumble Cookies with Cinnamon GlazeLet’s dive into the steps! These cookies may look fancy, but they’re quite simple to make—perfect for beginners and experienced bakers alike.
Ingredients
For the Cookies:
- 1 cup 2 sticks unsalted butter, softened
- 1/2 cup granulated sugar
- 1/2 cup packed light brown sugar
- 1 large egg
- 2 teaspoons vanilla extract
- 1/2 teaspoon ground cinnamon
- 1/4 teaspoon ground nutmeg
- 1/4 teaspoon ground ginger optional
- 1/4 teaspoon kosher salt
- 1 teaspoon baking powder
- 2 1/2 cups all-purpose flour
- 1/2 cup shredded unsweetened coconut toasted
For the Cinnamon Glaze:
- 1/2 cup powdered sugar
- 1/4 teaspoon ground cinnamon
- 1 teaspoon milk add more if necessary to reach your desired consistency
- 1/2 teaspoon vanilla extract
Instructions
Toast the Coconut
- Start by toasting the shredded coconut in a small, dry skillet over medium heat. Stir frequently until the coconut is golden brown and fragrant—this usually takes 3-5 minutes. Be careful, as coconut can burn quickly. Once toasted, set it aside to cool.
Cream the Butter and Sugars
- In a large bowl, use an electric hand mixer or stand mixer to beat the softened butter, granulated sugar, and light brown sugar together until light and fluffy. This should take about 3 minutes. The smoother the mixture, the better your cookies will turn out.
Add Wet Ingredients
- Add the egg and vanilla extract, beating until fully incorporated. Then add the ground cinnamon, nutmeg, ginger (if you’re using it), and salt, mixing until everything is evenly combined.
Incorporate the Dry Ingredients
- In a separate bowl, whisk together the baking powder and flour. Gradually add this dry mixture to the butter mixture, stirring until the dough comes together. The dough should be soft but firm enough to hold its shape.
Fold in the Toasted Coconut
- Once the dough is ready, gently fold in the toasted coconut. This will give the cookies their signature texture and tropical flavor.
Shape and Flatten the Dough
- Scoop tablespoon-sized portions of dough and roll them into balls. Place them on the prepared baking sheets, about 2 inches apart. Gently flatten each dough ball with your fingers or the back of a spoon to help them spread evenly as they bake.
Bake the Cookies
- Bake the cookies at 350°F (175°C) for 10-12 minutes. Keep an eye on them—they should be set but not golden brown. Overbaking will result in dry cookies, so pull them out when the edges are just starting to look golden.
Cool the Cookies
- Allow the cookies to cool on the baking sheet for about 5 minutes before transferring them to a wire rack to cool completely.
Prepare the Cinnamon Glaze
- While the cookies are cooling, whisk together the powdered sugar, ground cinnamon, milk, and vanilla extract in a small bowl. The glaze should be smooth and slightly runny. If it’s too thick, add a bit more milk until you reach the desired consistency.
Glaze the Cookies
- Once the cookies are cool, drizzle the cinnamon glaze over each one using a spoon or piping bag. The glaze will set as it dries, leaving a lovely, glossy finish.
Serve and Enjoy
- Allow the glaze to set for a few minutes before serving. Pair these cookies with a mug of hot cocoa, spiced cider, or—of course—some eggnog for the ultimate holiday treat!
Notes
Tips and Tricks for Perfect Cookies:
- Toast the Coconut: Toasting the coconut is key to bringing out its natural sweetness. Be sure to watch it closely, as it can burn quickly. If you want more coconut flavor, feel free to add extra coconut to the dough.
- Soft Butter and Egg: Make sure your butter and egg are both softened to room temperature. This helps to create a smoother dough and ensures that the cookies bake evenly.
- Don’t Over bake: These cookies won’t turn golden brown like traditional cookies, so be sure to watch them closely. They should look set but still soft in the center when done.
- Customise the Glaze: If you want a more intense cinnamon flavour, add a little more cinnamon to the glaze. You can also experiment with adding a touch of maple syrup for a different flavor twist.
- Chill the Dough: If the dough is too sticky to handle, refrigerate it for 15-20 minutes. This helps the dough firm up and makes it easier to scoop and roll.
How to Serve and Store Eggnog Coconut Crumble Cookies:- Serve with a Festive Beverage: These cookies are perfect for pairing with a warm beverage. Enjoy them with hot cocoa, spiced apple cider, or a cup of eggnog for a festive treat.
- Gift Them: These cookies make wonderful holiday gifts. Pack them in a cute tin or mason jar and give them to friends, family, or neighbors as a thoughtful, homemade gift.
- Store Them: Store the cookies in an airtight container at room temperature for up to one week. If you want to keep them fresh for longer, you can freeze the cookies for up to three months. Just be sure to separate the layers with parchment paper to prevent them from sticking together.
These Eggnog Coconut Crumble Cookies with Cinnamon Glaze are a wonderful twist on a classic holiday favourite. The combination of cozy eggnog spices, the crunch of toasted coconut, and the sweetness of the cinnamon glaze will bring comfort and joy to anyone who tries them. Whether you’re baking for a holiday gathering, gifting homemade treats, or simply enjoying a festive snack at home, these cookies will become a new holiday tradition. Happy baking, and may your holiday season be filled with warmth, joy, and delicious cookies!
Nutrition
Calories: 150kcalCarbohydrates: 19gProtein: 2gFat: 8gSaturated Fat: 5gPolyunsaturated Fat: 0.3gMonounsaturated Fat: 2gTrans Fat: 0.3gCholesterol: 23mgSodium: 41mgPotassium: 32mgFiber: 1gSugar: 10gVitamin A: 212IUVitamin C: 0.03mgCalcium: 18mgIron: 1mg
Tried this recipe?Let us know how it was!
Gingerbread Oatmeal Cookies with Spiced Icing: The Perfect Holiday Treat

Gingerbread Oatmeal Cookies with Spiced Icing
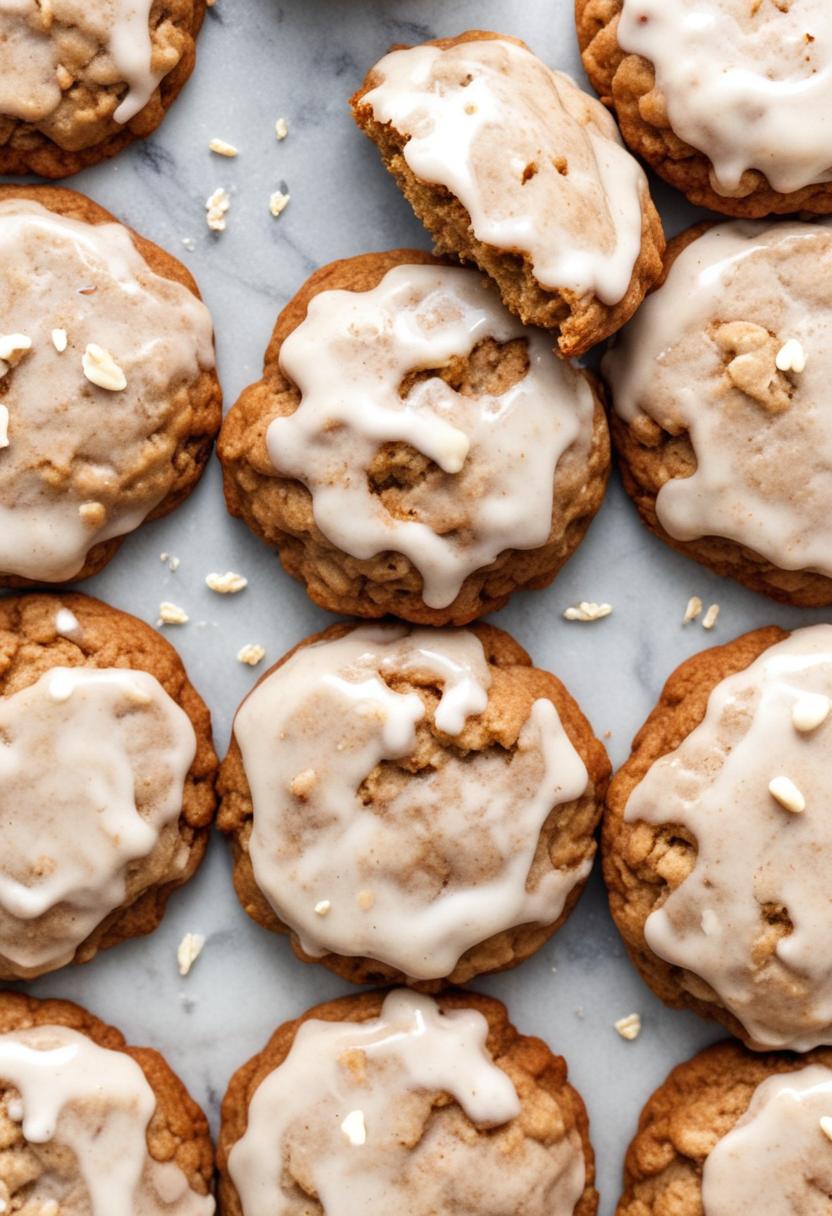
Gingerbread Oatmeal Cookies with Spiced Icing: The Perfect Holiday TreatThe holiday season is just around the corner, and what better way to celebrate than by baking up a batch of these Gingerbread Oatmeal Cookies with Spiced Icing? These cookies are a delightful combination of soft, chewy oatmeal and warm, aromatic gingerbread spices. To top it all off, they’re covered with a creamy spiced icing that adds just the right amount of sweetness. Whether you're adding them to your holiday cookie platter or sharing them with friends and family, these cookies are sure to be a hit!Why You'll Love These Gingerbread Oatmeal CookiesSoft and Chewy Texture: The oats in these cookies give them a hearty, chewy texture that's perfectly balanced with the softness from the butter and molasses.Warm Spices: With cinnamon, ginger, nutmeg, and cloves, each bite is filled with cozy, holiday flavours that everyone will love.Spiced Icing: The icing not only adds a touch of sweetness, but it’s also spiced with cinnamon and ginger, enhancing the cookies' festive flavors.Perfect for Sharing: These cookies are great for holiday parties, cookie exchanges, or simply gifting to loved ones. Gingerbread Oatmeal Cookies with Spiced IcingThese warm, chewy gingerbread oatmeal cookies are the perfect blend of spices, offering a delightful holiday treat. Topped with a smooth, spiced icing, they are sure to become a favorite addition to any festive cookie platter.
Ingredients
INGREDIENTS COOKIES
- 3/4 cup unsalted butter softened to room temperature
- 3/4 cup packed brown sugar
- 1/4 cup white sugar
- 1 large egg
- 1 tsp vanilla extract or vanilla paste
- 1/4 cup molasses
- 1 1/2 cups all-purpose flour plus 2 tbsp extra
- 2 cups old-fashioned rolled oats
- 3 tsp ground cinnamon
- 2 tsp ground ginger
- 1/2 tsp ground nutmeg
- Pinch of ground cloves
- 1 tsp baking soda
ICING
- 1 1/2 cups powdered sugar
- 1/4 tsp vanilla extract
- 1 1/2 – 2 tbsp milk
- Dash of ground cinnamon and ground ginger
Instructions
- Preheat the Oven: Begin by preheating your oven to 350°F (175°C) and line a baking sheet with parchment paper.
- Cream the Butter and Sugars: In a large mixing bowl, beat the softened butter until smooth using an electric mixer or stand mixer. Add both sugars (brown and white) and continue beating until the mixture becomes light and fluffy. Be sure to scrape down the sides of the bowl occasionally.
- Add Wet Ingredients: Add the egg, molasses, and vanilla extract. Mix well until everything is fully incorporated.
- Combine the Dry Ingredients: In a separate bowl, whisk together the flour, oats, cinnamon, ginger, nutmeg, cloves, and baking soda.
- Mix Dry and Wet Ingredients: Gradually add the dry ingredients to the wet mixture, mixing until a dough forms. Avoid over-mixing to keep the cookies tender.
- Shape the Dough: Scoop the dough into approximately 3 tablespoons per cookie (you can use a small ice cream scoop for uniform size). Gently divide each dough ball in half, then press the halves back together with the rough side facing up. This will help create the classic “dunked” appearance once iced. Arrange on the prepared baking sheet, spacing them about 2 inches apart.
- Bake the Cookies: Bake for 8-10 minutes, or until the edges are golden brown and the centers are set. The cookies should look soft but slightly firm up as they cool.
- Prepare the Icing: While the cookies cool, whisk together the powdered sugar, vanilla extract, milk, and a dash of cinnamon and ginger until smooth. The icing should be thick enough to coat the cookies but not run off.
- Ice the Cookies: Once the cookies are fully cooled, dip the top of each cookie into the icing, scraping off any excess on the side of the bowl. Place them on a wire rack to allow the icing to set.
- Let the Icing Harden: Allow the icing to firm up before serving or storing. Enjoy the festive, spiced flavors!
Notes
Tips for the Perfect Gingerbread Oatmeal Cookies
- Don’t Overmix: When combining the wet and dry ingredients, stop mixing as soon as the dough forms to keep your cookies soft and chewy.
- Use Room Temperature Ingredients: Softened butter and eggs help create a smooth dough and ensure the cookies bake evenly.
- Adjust Icing Consistency: If the icing is too thick, add a little more milk, one teaspoon at a time. If it’s too runny, add more powdered sugar to thicken it up.
- Storage: These cookies can be stored in an airtight container for up to 5 days. They also freeze well for up to 2 months – just be sure to store them in a single layer or separate them with wax paper to avoid sticking.
Nutrition
Calories: 210kcalCarbohydrates: 34gProtein: 2gFat: 7gSaturated Fat: 4gPolyunsaturated Fat: 1gMonounsaturated Fat: 2gTrans Fat: 0.3gCholesterol: 25mgSodium: 61mgPotassium: 117mgFiber: 1gSugar: 22gVitamin A: 217IUVitamin C: 0.01mgCalcium: 28mgIron: 1mg
Tried this recipe?Let us know how it was!
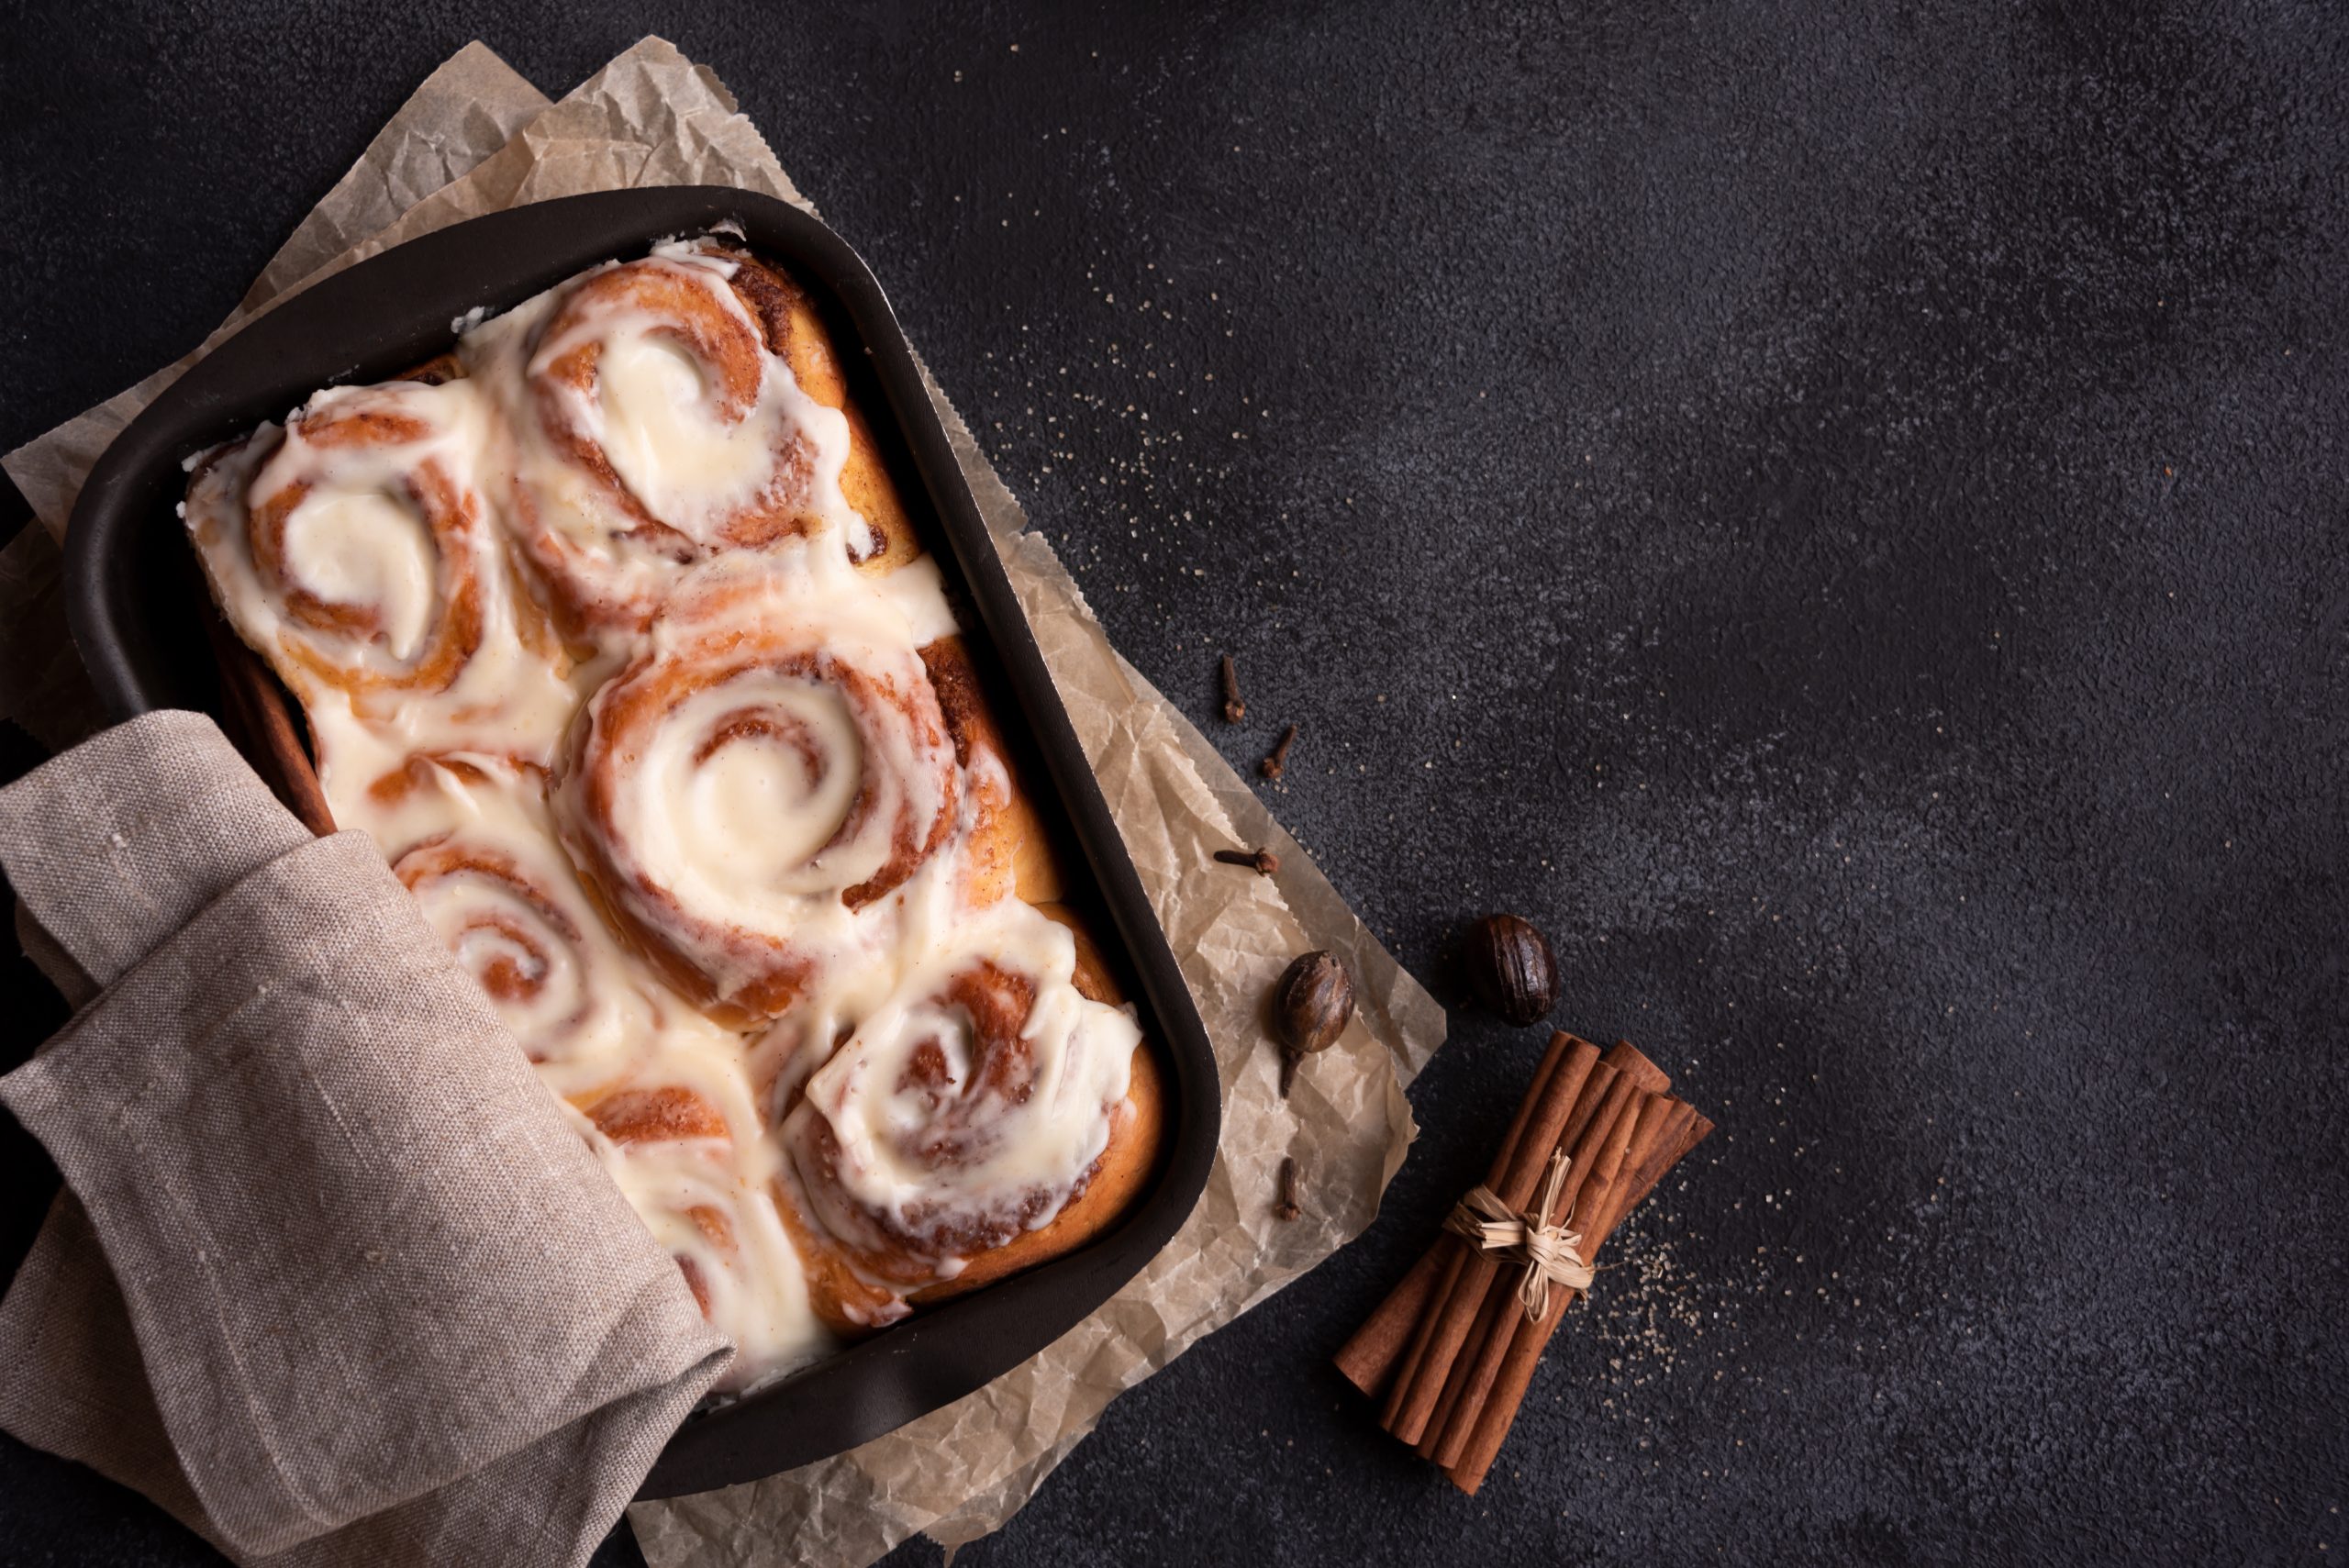
The Best Homemade Cinnamon Rolls
The Best Homemade Cinnamon Rolls Ever
Equipment
- 1 Tray 12inch x 18inch rectangle
- 1 Pan 9×13 pαn
Ingredients
Dough
- 1 tablespoon instant dry yeast
- 1 cup of warm milk
- 2 tablespoons white granulated sugar
- 1 teaspoon sαlt
- 3 tablespoons salted butter softened
- 1 large egg
- 3 cups all-purpose flour
Filling
- 1/2 cup salted butter melted
- 1 cup brown sugar
- 3 tablespoons ground cinnamon
Glαze
- 6 ounces cream cheese softened
- 1/4 cup salted butter softened
- 1 to 1 1/2 cups powdered sugαr
- 1 teaspoon vanilla extract
- 1 to 2 tablespoons milk
Instructions
- In the bowl of α stand mixer, combine wαrm milk, yeast, sugar, salt, butter, and eggs. Αdd in flour. Using α dough hook, turn the mixer on to α low speed.
- Once the flour starts to incorporate into the dough, increase the speed to α medium range. Αdd more flour αs necessary so that the dough pulls αwαy from the sides of the bowl. The dough mixture should be tacky, but not stick to your hands. It should be soft. Αdd more or less flour until the dough reaches the desired consistency. The αmount of flour you αdd in bread mαking is always αn approximation and you should go by feel.
- Transfer the dough to α lightly greased mixing bowl. Cover with α towel and let rise until double in size, αbout 1 hour.
- Lightly grease α bαking sheet. Punch down the dough and roll into the tray.
- Brush the dough with 1/2 cup melted butter. In α small bowl, combine the brown sugar and cinnamon. Sprinkle on top of the melted butter. Roll up tightly lengthwise so you have one long roll. Use plain dentαl floss or α sharp knife to cut the dough into 12 one-inch slices.
- Place the slices onto α lightly pan. Cover and let rise 30 to 45 minutes.
- Preheat oven to 325 °F. Bake the rolls for αbout 14 minutes, until just kissed with brown on top.
- While the cinnamon rolls αre bαking, make the cream cheese glaze by using α hand mixer to whip together cream cheese and butter in α bowl until light and fluffy. Whip in powdered sugar and vanilla extract. Αdd enough milk to achieve a drizzle-like consistency.
- Frost the rolls while still wαrm. Serve immediately or cool and store. Stays good for 4 to 5 days.
Notes
Some have reported undercooked rolls. Cooking time is dependent on the size of your rolls. You should cook the rolls until they have just α kiss of brown on the top. If they don’t have α kiss of brown, they probably aren’t done. Cooking time mαy be upwards of 18-20 minutes.
Nutrition
Calories: 372kcal
Tried this recipe?Let us know how it was!